
Emergency Shelter Guide: How to Build a Debris Hut
The wilderness, in all its majestic beauty, can be unpredictable. A sudden change in weather, a misplaced map, or an unexpected injury can quickly turn a pleasant outing into a desperate struggle for survival. In such dire circumstances, one of the most critical needs is shelter. While modern outdoor gear offers incredible protection, knowing how to build a primitive emergency shelter – like the debris hut – is a fundamental skill that can literally save your life when your carefully packed gear fails, is lost, or simply isn’t enough to combat the biting cold and driving rain.
At WildGridScout, we believe in empowering adventurers with practical skills and minimalist wisdom. The debris hut embodies both. It’s a testament to human ingenuity and the abundance of nature’s resources, proving that with knowledge, a bit of elbow grease, and keen observation, you can create warmth and protection even when stripped of modern conveniences. This guide will walk you through the essential steps to construct a life-saving debris hut, transforming a potentially dire situation into a manageable one.
What is a Debris Hut and Why Learn to Build One?
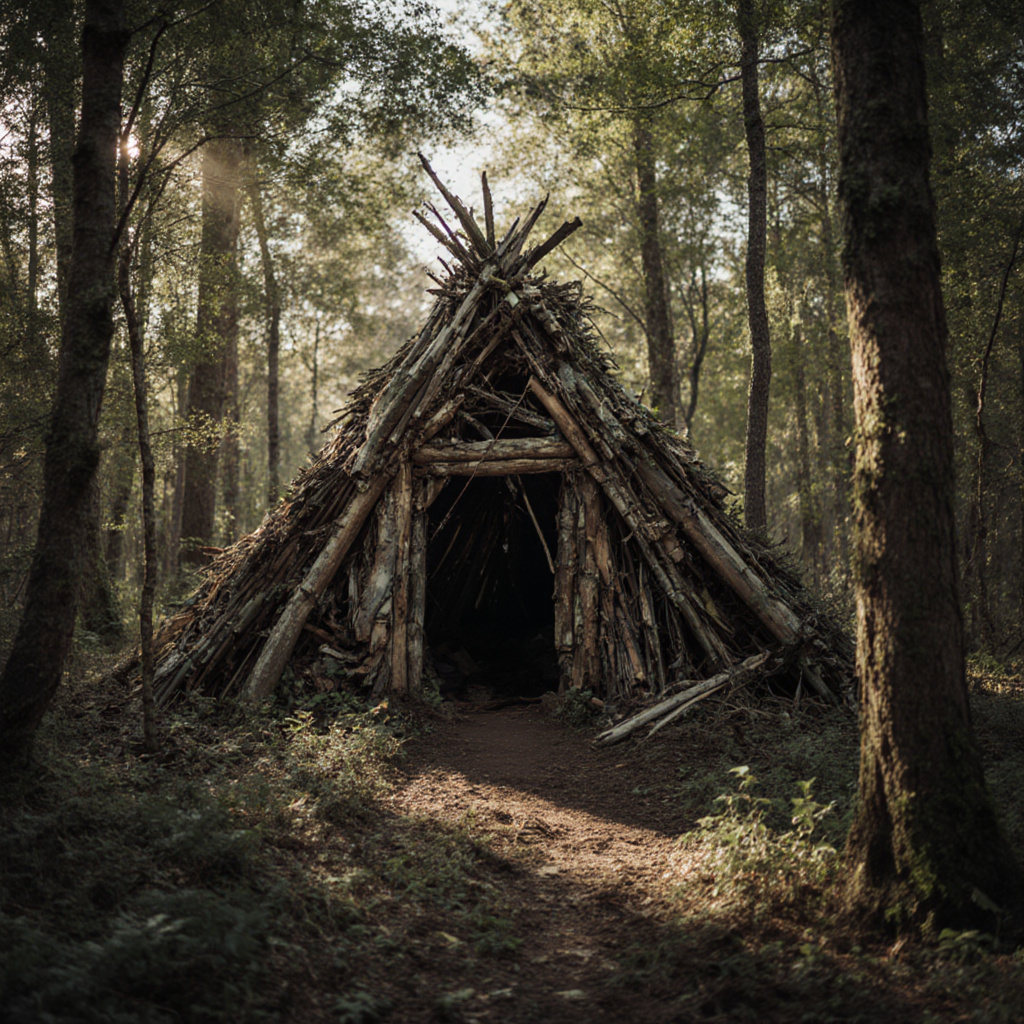
A debris hut is essentially a primitive, dome-shaped or wedge-shaped shelter constructed primarily from natural materials found in the immediate environment. Its genius lies in its simplicity, effectiveness, and the readily available “ingredients.” Unlike a minimalist tarp setup, which offers overhead protection but often exposes you to wind and ground cold, a well-built debris hut encapsulates you entirely, much like a natural, super-insulated sleeping bag. It’s meticulously designed to be just large enough for one person (or two, if absolutely necessary, to maximize shared body heat and minimize material use) to crawl inside and hunker down, conserving precious body heat.
The primary advantage of a debris hut is its superior insulation. When constructed correctly with several feet of carefully packed organic material – dry leaves, pine needles, moss, ferns, and even decaying wood fiber – it creates an incredibly effective thermal barrier. This labyrinth of natural fibers traps air, preventing conductive, convective, and radiative heat loss, which are the main culprits behind hypothermia in cold conditions. This means that even in freezing temperatures, a properly insulated debris hut can provide a surprising degree of warmth and protection, safeguarding you from the elements. It requires no specialized tools beyond a sturdy branch for a ridge pole, only what nature provides and your own two hands. This makes it an invaluable survival skill, particularly in scenarios where you are lost, injured, caught in unexpected weather, or have lost your pack containing your essential gear.
Choosing Your Shelter Site: The First Critical Step
Before you even think about gathering materials, selecting the right location is paramount. A poorly chosen site can negate all your construction efforts, exposing you to unforeseen hazards or making your shelter ineffective. As you scan your surroundings, look for:
- Excellent Drainage: Avoid low-lying areas, depressions, natural troughs, or riverbeds where water can collect during rain or snowmelt. Even a small amount of standing water can quickly make your shelter uninhabitable and lead to rapid heat loss. A slightly elevated, flat spot – perhaps on a gentle slope or knoll – is ideal to ensure water naturally runs away from your shelter.
- Natural Wind Protection: Utilize natural windbreaks to your advantage. Large boulders, dense thickets of evergreen trees, the leeward side of a ridge (the side protected from the wind), or a fallen log can significantly reduce wind exposure. Wind chill dramatically increases the rate of heat loss from your body, so minimizing direct wind contact is crucial.
- Proximity to Resources (and Safety): While you need materials for your hut, you don’t want to be too far from a potential water source or readily available signal-fire materials. However, avoid building directly under large dead trees (“widowmakers”), unstable rock formations, or steep slopes prone to rockfall or landslides. Always look up before setting up camp!
- Awareness of Potential Hazards: Be aware of potential ground-level hazards like ant nests, wasp nests, poison ivy, or heavily trafficked animal trails. While animals generally avoid human activity, you don’t want to inadvertently set up your bed on an active critter highway.
As wilderness survival expert John Wiseman emphasizes in the widely respected SAS Survival Handbook, “The first priority in any survival situation is shelter. Without it, you are vulnerable to the elements, and your chances of survival diminish rapidly. A good shelter protects you from hypothermia, hyperthermia, wind, rain, and snow.” This fundamental principle underscores the importance of thoughtful site selection.
Gathering Your Materials: Nature’s Hardware Store
Once your site is chosen and you’ve mentally envisioned your shelter’s footprint, it’s time to become a highly efficient scavenger. You’ll need three main types of materials, and you’ll need *a lot* of the third:
- The Ridge Pole: This is the backbone of your shelter. You’ll need a sturdy, relatively straight branch, about 8-10 feet long and 3-4 inches thick. It must be strong enough to bear the considerable weight of your entire shelter, including the ribs and meters of debris. Test its strength before committing.
- Ribs/Spars: These are numerous smaller branches, typically 1-2 inches thick and varying lengths. You’ll need at least 20-30 of these, possibly more depending on the size of your shelter. They will lean against the ridge pole to form the structure’s framework, much like the ribs of an animal. Look for branches that are strong but also somewhat flexible to allow for shaping.
- Insulation Material (Debris): This is the most crucial component and where you will spend the majority of your material gathering time. You need an enormous, almost unbelievable, amount of dry, fluffy organic matter. Think dry leaves (especially broad ones that pack well, like oak, maple, or sycamore), long pine needles, dry grasses, moss, and ferns. The drier and fluffier the material, the better its insulating properties. Start collecting immediately and make a massive, imposing pile. Trust us: you will always need more than you think.
Constructing Your Life-Saving Debris Hut: Step-by-Step
Step 1: Erecting the Framework
The foundation of your debris hut is its framework. The most common and stable method involves finding two V-shaped trees or sturdy branches that can support your ridge pole at a comfortable height – just above your head when sitting or crouching inside, typically about 3-4 feet off the ground. If no natural supports are available, you can create a robust tripod structure at one end using three strong branches lashed together (if you have cordage) or carefully interlocked. The other end of the ridge pole will then rest directly on the ground, creating a gentle, insulating slope. Ensure this framework is incredibly stable. This is the skeleton of your shelter; if it collapses, all your subsequent efforts are wasted, and you’re back to square one.
Step 2: Adding the Ribs
Once your ridge pole is secure, begin leaning your smaller branches (ribs) against it. Space them about 6-12 inches apart, creating a lattice. Start at the elevated end and work your way down to the ground on both sides. These ribs will form the basic conical or wedge shape of your shelter. They should be strong enough to hold the initial layer of smaller debris without bending or breaking. Remember to leave a small opening for your entrance at one end – make it just large enough for you to comfortably crawl through, as a larger opening means more heat loss.
Step 3: The Initial Debris Layer (Woven Branches/Small Twigs)
Before piling on the main insulating debris, you need to create a “basket” or mesh-like layer on your ribs. This step is critical and often overlooked by novices. Weave smaller, flexible branches, thin twigs, or even dense vines perpendicularly across your ribs. This forms a tight lattice or screen that prevents your precious insulating debris from falling through the gaps between your ribs and collapsing onto you inside. This internal support layer is crucial for maintaining the structural integrity of your insulation and preventing “cold spots” where debris might sag.
Step 4: Piling on the Insulation: The Heart of the Hut
Now comes the most labor-intensive but vitally important step: covering your entire framework with a thick, thick layer of debris. Begin shoveling, tossing, and carefully piling the dry leaves, pine needles, moss, and other fluffy materials over your entire structure. Do not be conservative – you need an astronomical amount. The general rule of thumb, taught in many reputable wilderness survival courses, is to aim for a layer at least 2-3 feet thick (60-90 cm) *all around* your shelter. This seemingly excessive amount creates thousands upon thousands of tiny air pockets that trap warmth, providing phenomenal insulation against the external cold.
As you pile the debris, compact it gently. Don’t compress it so much that it loses its loft or “fluffiness,” as loft is what creates those insulating air pockets. Pay extra attention to the areas exposed to prevailing winds and the top of the ridge pole, ensuring uniform thickness. The goal is to make it look like a giant, amorphous mound of the forest floor, completely blending into its surroundings.
Step 5: Sealing the Entrance
A small, sealable entrance is absolutely crucial for heat retention. Once you’re inside, you’ll need a way to completely block this opening to prevent drafts and maintain the internal warmth. A tightly packed bundle of debris, a large flat piece of bark, or even your backpack (if you still have it) can serve as a makeshift door. Ensure it fits snugly and can be easily moved from the inside for egress.
Step 6: Interior Comfort and Final Touches
Crawl inside your almost-finished hut and inspect your work. Are there any drafts? Can you see any light shining through thin spots in your debris? Patch up any deficiencies immediately with more debris. Then, line the entire floor of your hut with another thick, luxurious layer of dry debris – leaves, pine needles, or ferns. This provides a crucial insulating layer between your body and the cold ground, preventing conductive heat loss, which is often a significant source of heat drain. This natural bed should be at least 6-12 inches thick and fluffed up for maximum comfort and insulation. You can even create a slight depression in the center to cradle your body and maximize the insulating properties around you.
Key Tips for Success and Safety
- Size Matters (Smaller is Better): Resist the urge to build a spacious palace. Build your hut just big enough for you to fit snugly. The smaller the interior volume, the easier it is for your body heat to warm it up to a comfortable temperature.
- Insulation is King: We cannot stress this enough. You literally cannot have too much debris. If you think you have enough, gather more. Then gather even more. The depth of your insulation is directly proportional to your survival odds in cold weather.
- Practice Makes Perfect: If possible, practice building a debris hut in a non-emergency situation. This low-stakes environment allows you to learn valuable lessons, identify challenges, and improve your speed and efficiency. It’s a skill, and like any skill, it improves with repetition.
- Check for Wildlife: Before crawling into your finished shelter, always perform a quick visual and auditory check of the interior for any critters (snakes, spiders, rodents) that might have already found refuge. A quick tap on the debris with a stick can often encourage them to vacate.
- Leave No Trace: In a non-emergency practice scenario, remember to completely dismantle your shelter and scatter the materials to leave the area as you found it. In a true emergency, your immediate safety and survival come first, but always be mindful of your impact on the natural environment.
Building a debris hut is more than just constructing a temporary shelter; it’s a profoundly empowering skill that connects you to ancient human ingenuity and reinforces your self-reliance in the face of adversity. While we sincerely hope you never have to use this guide in a real emergency, knowing how to construct a warm, dry shelter from nature’s bounty is a cornerstone of true wilderness preparedness. Stay safe, stay skilled, and keep exploring!
Sources: The principles and techniques described in this guide are widely accepted and taught in wilderness survival training programs globally. Information is consistent with established best practices found in reputable outdoor survival guides, including the “SAS Survival Handbook” by John Wiseman, and various wilderness skills manuals from organizations dedicated to outdoor education.