How to Make Your Own Paracord Survival Bracelet
In the vast expanse of the wild, where every ounce of gear counts and preparedness can mean the difference between a minor setback and a major emergency, few items offer the versatility and peace of mind of a simple paracord survival bracelet. For adventurers, minimalists, and anyone venturing beyond the paved path, this unassuming accessory is more than just a fashion statement; it’s a compact bundle of life-saving potential, ready to unravel at a moment’s notice.
Here at WildGridScout, we champion self-reliance and intelligent packing. Crafting your own paracord survival bracelet isn’t just a rewarding DIY project; it’s an investment in your safety and a step towards mastering essential outdoor skills. In this comprehensive guide, we’ll walk you through the process of creating your own robust paracord bracelet, explore its myriad uses in a survival scenario, and discuss why it’s an indispensable piece of minimalist gear for any outdoor enthusiast.
What is Paracord and Why is it So Essential?
At its heart, paracord, or parachute cord, is a lightweight nylon kernmantle rope originally used in the suspension lines of parachutes. What makes it so extraordinary for outdoor use is its strength-to-weight ratio and its ingenious construction. Standard Type III 550 paracord, the most common variety for survival applications, has a minimum breaking strength of 550 pounds. More impressively, its core consists of seven individual two-ply strands, each of which can be pulled out and used independently for various tasks, effectively multiplying your available cordage.
Imagine having 10 to 12 feet of incredibly strong rope woven neatly around your wrist. Now imagine that same rope capable of being broken down into over 100 feet of usable cordage. This incredible adaptability is why paracord is lauded by preppers, hikers, campers, and military personnel worldwide. It’s the ultimate “just in case” item, ensuring you’re never without a vital resource when venturing into the unknown.
Gather Your Materials: What You’ll Need
Before we dive into the knot-tying, gather these essential items. Quality materials make for a quality bracelet that will serve you well when you need it most.
- Paracord (Type III 550): For an average adult wrist (7-8 inches), you’ll need approximately 10-12 feet (3-3.7 meters) of paracord. Choose a color you like, but consider brighter colors for visibility in an emergency.
- Side-Release Buckle: A 1/2-inch or 5/8-inch buckle is ideal. These are readily available at craft or outdoor stores. Ensure it’s sturdy.
- Scissors or a Sharp Knife: For cutting the paracord cleanly.
- Lighter or Heat Source: To melt and fuse the ends of the paracord, preventing fraying.
- Ruler or Measuring Tape: To accurately measure your wrist and the paracord.
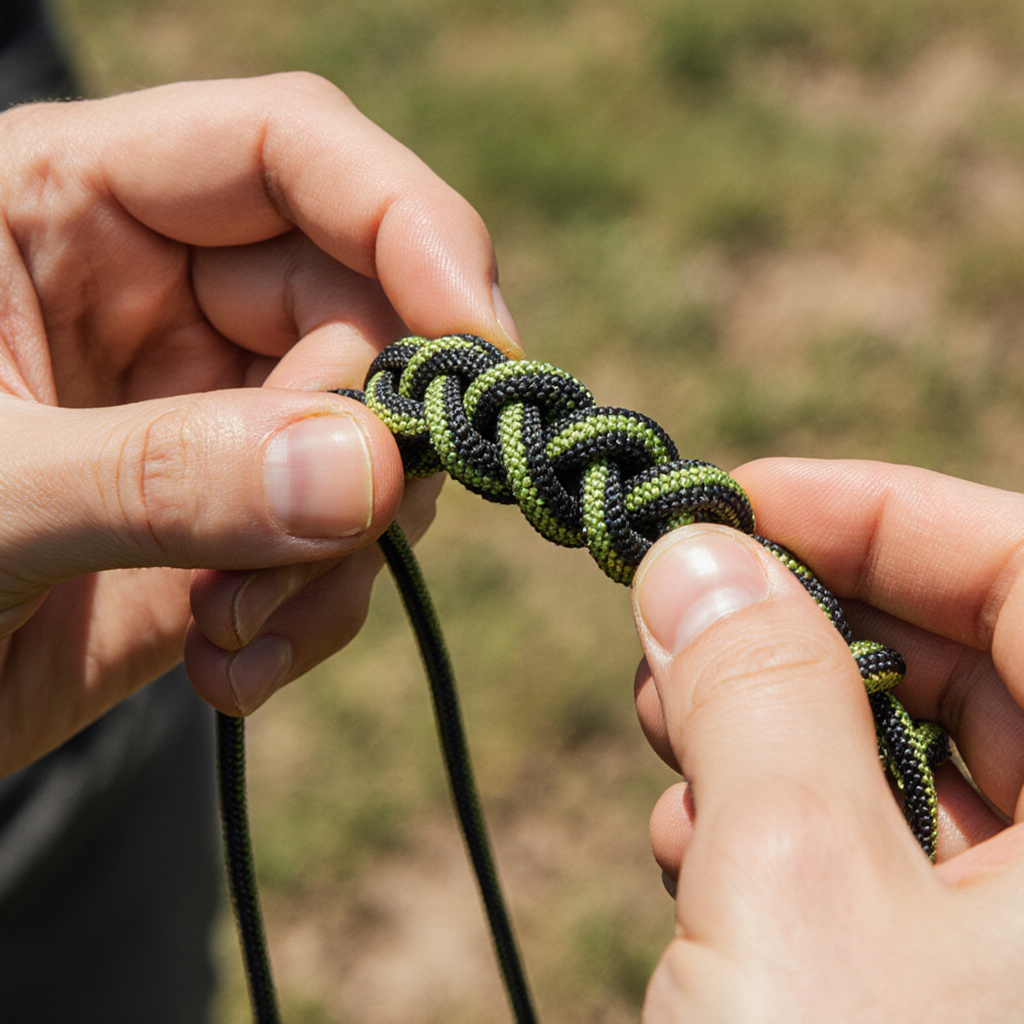
Step-by-Step Guide: Crafting Your Cobra Weave Paracord Bracelet
The Cobra Weave, also known as the Solomon Bar or Portuguese Sinnet, is one of the most popular and robust methods for making a paracord bracelet. It’s relatively simple to learn and creates a dense, secure knot pattern.
Step 1: Measure and Prepare Your Cord
First, measure your wrist. Add about an inch (2.5 cm) to this measurement to account for the buckle and knot thickness. This will be your desired finished bracelet length.
Next, take your 10-12 feet of paracord and fold it in half. You now have a loop at the fold and two loose ends. This loop will be where you attach to the buckle, and the two loose ends will be your working cords.
Step 2: Attach to the Buckle
Feed the folded loop through one half of your side-release buckle (usually the female end, but either works). Then, feed the two loose ends through the loop you just created. Pull tightly to secure the paracord to one half of the buckle. This is called a “cow hitch” or “lark’s head” knot.
Now, take the two loose ends and thread them through the other half of the buckle. Adjust the length of the central strands so that the distance between the two buckle halves matches your desired finished bracelet length (wrist measurement + 1 inch). The two strands running between the buckle halves are your “core strands,” and the two outer strands are your “working strands.”
Step 3: Begin the Cobra Weave (The First Half Knot)
Lay your buckle flat. Take the right working strand and pass it over the two core strands and under the left working strand.
Now, take the left working strand and pass it under the two core strands and through the loop created by the right strand.
Pull both working strands tightly and evenly to form your first knot. It should be snug against the buckle.
Step 4: Complete the Cobra Weave (The Second Half Knot)
For the next knot, you reverse the process. Take the left working strand (the one that came from under the core in the previous step, now on the left) and pass it over the two core strands and under the right working strand.
Then, take the right working strand and pass it under the two core strands and through the loop created by the left strand.
Again, pull both working strands tightly and evenly. You’ll see the distinctive Cobra Weave pattern starting to form.
Step 5: Repeat and Finish
Continue alternating steps 3 and 4 (left over/right under, then right over/left under) until you reach the desired length, snug against the second buckle half. Ensure your knots are consistently tight and uniform for a professional look and maximum strength.
Once you’ve made your last knot, flip the bracelet over. Trim the two working strands close to the knot, leaving about 1/8 to 1/4 inch (3-6 mm). Carefully melt the ends with your lighter and press the molten nylon against the adjacent knot with the metal part of the lighter or a sturdy, non-flammable object. Be cautious not to burn yourself or the bracelet. This fuses the ends, preventing unraveling.
Beyond the Wrist: Practical Survival Uses for Your Paracord Bracelet
Once you’ve mastered the art of making your bracelet, understanding its potential applications is paramount. When disaster strikes or an unexpected challenge arises, knowing how to deploy and utilize your paracord can be a game-changer. Here are some of the most critical survival uses:
- Shelter Building: One of the most common and vital uses. Use the cord to secure tarps, fashion makeshift lean-tos, or tie branches together for a more robust structure. (Source: Wilderness Survival Guides)
- Fire Starting (Bow Drill): The inner strands can serve as a strong, non-stretching string for a bow drill, a primitive but effective method for starting a friction fire. (Source: Bushcraft & Survival Manuals)
- Fishing Line/Snare Wire: Unravel the inner strands. The thin, strong lines can be used as fishing line, or combined with ingenuity, fashioned into small game snares. (Source: Outdoor Skills Handbooks)
- Tourniquet/Sling: In a medical emergency, paracord can be used to improvise a tourniquet to control severe bleeding (use only as a last resort and with caution due to risks) or as a sling to support an injured limb. (Source: First Aid & Trauma Care Resources)
- Gear Repair: From replacing a broken shoelace or backpack strap to securing a loose tent pole, paracord is excellent for impromptu repairs in the field.
- Clothesline: A simple but often overlooked convenience – dry your wet clothes or gear.
- Bear Bag Hanger: Suspend your food and scented items high off the ground to keep them safe from bears and other wildlife.
- Navigation Aid: Mark a trail or create a perimeter with brightly colored paracord if you need to scout an area and return to a specific point.
Remember, practice these skills in a non-emergency setting. Familiarity with knot tying and improvisational techniques will make all the difference when it truly matters.
The WildGridScout Philosophy: Minimalist Gear, Maximum Preparedness
The paracord survival bracelet perfectly embodies the WildGridScout ethos. It’s a multi-functional tool that takes up minimal space and weight, yet offers maximum utility. In a world often over-saturated with specialized gear, the paracord bracelet stands out as a testament to intelligent design and the power of simplicity. It encourages a mindset of self-reliance and creative problem-solving, rather than relying on an endless array of single-purpose items.
By learning to make and use this simple piece of gear, you’re not just acquiring a tool; you’re investing in a skill. You’re becoming more attuned to the resources around you and developing the confidence to handle unexpected situations with grace and capability.
Conclusion: Empower Yourself, Explore Safely
Creating your own paracord survival bracelet is a small step with significant implications for your outdoor adventures. It’s a tangible symbol of preparedness, a practical tool, and a constant reminder to stay sharp and aware in the wilderness. Whether you’re planning a weekend hike, a multi-day backpacking trip, or just want to be ready for the unexpected, this bracelet is an essential companion.
So, gather your materials, follow these steps, and empower yourself with a piece of gear that truly belongs on every adventurer’s wrist. Stay safe, stay wild, and keep scouting!