How to Prevent and Treat Blisters on a Hike
The Blister Battle: Conquering Foot Pain on the Trail
Blisters: the bane of every hiker’s existence. A tiny, seemingly innocuous bubble can derail an epic adventure, turning breathtaking vistas into a painful trudge. At WildGridScout, we believe that enjoying the wilderness to its fullest means being prepared for its challenges, and few challenges are as universally frustrating as a foot blister. This comprehensive guide will equip you with the knowledge to not only prevent these vexing vesicles but also to treat them effectively should they appear, ensuring your focus remains on the trail ahead, not the discomfort beneath your feet.
Understanding the Enemy: What Causes Blisters?
Before we dive into prevention, let’s understand why blisters form. Blisters are essentially fluid-filled sacs that develop when friction causes the outer layers of the skin to separate from the inner layers. Heat and moisture exacerbate this process, creating a perfect storm for blister formation. On a hike, repetitive motion, ill-fitting footwear, synthetic socks that trap moisture, and even small particles of dirt can all contribute to this painful phenomenon.
The Art of Prevention: Keeping Blisters at Bay
1. The Foundation: Footwear Choice & Fit
- The Right Shoes: This is paramount. Your hiking boots or shoes should be comfortable from the moment you put them on, offering ample toe room while securing your heel to prevent slippage. Avoid shoes that are too tight, which can cause pressure points, or too loose, leading to excessive friction.
- Break Them In: Never embark on a long hike with brand-new footwear. Gradually break in new boots or shoes over several weeks with shorter walks. This allows the material to soften and conform to your foot’s unique shape.
- Lacing Technique: Experiment with different lacing methods to customize the fit. Heel-lock lacing can reduce heel lift, while skipping eyelets can relieve pressure on sensitive areas.
2. The Second Skin: Socks Matter
- Material is Key: Ditch cotton! Cotton absorbs moisture and holds it against your skin, creating a perfect breeding ground for blisters. Opt for synthetic materials like polyester or merino wool, which wick moisture away from your feet.
- Layering for Success: Many experienced hikers advocate for a two-sock system. A thin, moisture-wicking liner sock (often made of polypropylene or synthetic blend) worn directly against the skin, followed by a thicker, cushioned outer sock (merino wool or synthetic). The inner sock moves with your foot, reducing friction against the outer sock, which then absorbs and wicks away moisture.
- Clean & Dry: Always start with clean, dry socks. Carry spare pairs and change them if your feet get wet or excessively sweaty.
3. Foot Prep: Preemptive Strikes
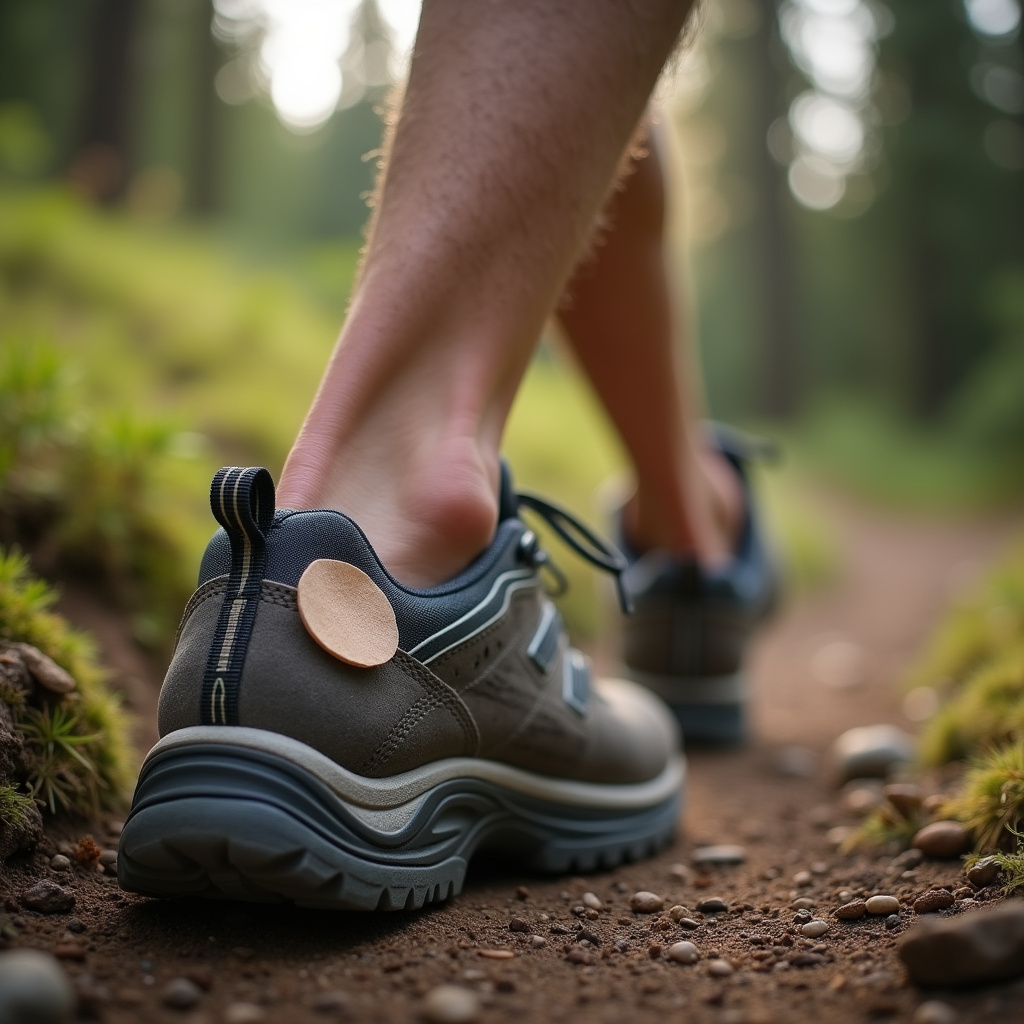
- Taping & Lubrication: For known hot spots or areas prone to blistering, apply preventative measures. Athletic tape (like Leuko tape or kinesiology tape) or specialized blister prevention tape can create a protective barrier. Alternatively, some hikers use petroleum jelly or anti-chafing balms to reduce friction.
- Powders & Antiperspirants: Foot powders can help absorb moisture, keeping your feet drier. For those with particularly sweaty feet, a foot antiperspirant (applied the night before) can significantly reduce perspiration.
- Trim Toenails: Long toenails can press against the front of your shoes, leading to bruising or blisters. Keep them trimmed short and filed smooth.
4. On the Trail: Vigilance is Key
- Listen to Your Feet: Pay attention to “hot spots”—areas of redness, tenderness, or irritation. These are early warning signs that a blister is forming.
- Regular Checks & Breaks: During longer hikes, take off your shoes and socks during breaks. Allow your feet to air out and dry. Check for any hot spots and address them immediately. A few minutes spent preventing a blister can save hours of pain later.
- Adjust if Needed: If your feet feel squished or loose, adjust your lacing. If your socks are wet, change them. Don’t wait until the pain becomes unbearable.
The Art of Treatment: When Blisters Strike
Despite your best efforts, blisters can sometimes still form. Knowing how to treat them properly can prevent infection and allow you to continue your hike with minimal discomfort. Always carry a well-stocked first-aid kit that includes blister-specific supplies.
1. Addressing Hot Spots:
- At the first sign of a hot spot, stop immediately.
- Clean the area with an antiseptic wipe.
- Apply moleskin, a specialized blister plaster (like Compeed), or medical tape directly over the hot spot. Ensure the edges are smooth and adhere well to prevent further friction. A donut-hole cut into moleskin can relieve pressure around a tender spot.
2. Treating Intact Blisters (Small & Non-Painful):
- Do Not Pop: If a blister is small, not very painful, and intact, it’s generally best to leave it undisturbed. The fluid inside is sterile and provides a natural cushion, protecting the underlying skin from infection.
- Protect It: Apply moleskin, a hydrocolloid dressing, or a specialized blister patch over the blister. These dressings provide cushioning and can help absorb any fluid if the blister breaks naturally.
3. Treating Large, Painful, or Already Ruptured Blisters:
- When to Drain: If a blister is large, very painful, or appears likely to rupture on its own, carefully draining it may be necessary to relieve pressure and pain.
- Sterilize Everything:
- Wash your hands thoroughly with soap and water or use hand sanitizer.
- Clean the blister and surrounding skin with an antiseptic wipe (alcohol prep pad or iodine).
- Sterilize a sharp needle (a new sewing needle, safety pin, or scalpel blade works well) by passing it through a flame (e.g., from a lighter) until red hot, then allow it to cool, or wipe it with an alcohol pad.
- The Draining Process:
- Create a small puncture wound at the base of the blister, near its edge, where the skin is thickest. Multiple small punctures might be better than one large one.
- Gently press the fluid out of the blister towards the puncture hole, using a clean gauze pad or tissue. Do not remove the roof of the blister – this skin acts as a protective barrier.
- Once drained, clean the area again with an antiseptic wipe.
- Dressing the Drained Blister:
- Apply an antibiotic ointment (like Neosporin) to prevent infection.
- Cover the blister with a sterile dressing. A hydrocolloid bandage (like Compeed) works exceptionally well here, as it promotes healing and provides cushioning. If using moleskin, cut a donut shape to relieve pressure and cover with gauze.
- Secure the dressing with medical tape.
- Post-Treatment Care: Change dressings daily, or more frequently if they become wet or dirty. Monitor for signs of infection (increased redness, swelling, pus, warmth, fever).
Cited Sources:
- REI Co-op. (n.d.). How to Prevent and Treat Blisters.
- NOLS Wilderness Medicine. (2017). Foot Care and Blister Management.
- Wilderness Medical Society. (2019). Practice Guidelines for the Prevention and Treatment of Blisters in the Wilderness. Wilderness & Environmental Medicine, 30(2), S86-S93.
Conclusion:
Blisters don’t have to be the end of your hiking dreams. By investing in proper footwear, choosing the right socks, meticulously preparing your feet, and carrying a well-stocked first-aid kit, you can significantly reduce your risk of developing these trail-side nuisances. Remember, prevention is always better than cure, but knowing how to effectively treat a blister means you’re empowered to face whatever the trail throws your way. So lace up, stay dry, and keep exploring – your adventure awaits!