How to Start a Fire with a Ferro Rod: A Step-by-Step Guide
Mastering fire is arguably one of humanity’s oldest and most vital skills, a cornerstone of survival and comfort in the wilderness. While many campers rely on lighters or matches, the humble ferro rod stands out as a reliable, weather-resistant, and incredibly satisfying tool for igniting a flame. For those embracing the raw essence of the outdoors, understanding how to wield a ferro rod isn’t just a trick; it’s a fundamental outdoor skill, a testament to self-reliance, and a gateway to deeper bushcraft. Welcome to WildGridScout, where we demystify practical outdoor skills and equip you for your next adventure. In this comprehensive guide, we’ll break down everything you need to know about starting a fire with a ferro rod, turning you from a spark-curious novice into a flame-wielding expert.
What is a Ferro Rod?
Often mistaken for “flint and steel,” a ferro rod, or ferrocerium rod, is a synthetic pyrophoric alloy that produces hot sparks when scraped with a sharp, hard edge. Invented in the early 20th century, ferrocerium is a mixture of metals, primarily iron and cerium, along with small amounts of lanthanum, neodymium, and praseodymium. When friction is applied, tiny pieces of the alloy shear off and oxidize rapidly, creating sparks that can reach temperatures of up to 3,000°C (5,400°F). These intense sparks are hot enough to ignite a wide range of tinder materials, even in less-than-ideal conditions.
Why Choose a Ferro Rod for Fire Starting?
In a world of modern conveniences, why revert to such a seemingly primitive method? The answer lies in the ferro rod’s unparalleled reliability and robustness. Unlike matches that can get wet and become useless, or lighters that can run out of fuel or malfunction in cold weather, a ferro rod is virtually impervious to the elements. It works when wet, it functions reliably at various altitudes and temperatures, and it doesn’t rely on fickle mechanisms. It’s also incredibly durable, offering thousands of strikes from a single rod, making it a sustainable and long-term investment for any outdoor enthusiast. Furthermore, the skill involved in using one fosters a deeper connection to nature and a greater appreciation for the art of firecraft. (Source: Outdoor education literature)
Essential Components for Fire Starting with a Ferro Rod
Before you even think about striking, gather your materials. Starting a fire isn’t just about creating a spark; it’s about understanding the fire triangle: heat (the spark), fuel (tinder, kindling, fuelwood), and oxygen. Here’s what you’ll need:
- Ferro Rod and Striker: Your primary tools. Many ferro rods come with a dedicated steel striker, but the spine of a sturdy knife (with a 90-degree angle) or a piece of broken hacksaw blade works just as well.
- Tinder: This is the superstar that catches the spark. Tinder needs to be incredibly fine and fluffy, with a large surface area to ignite easily. Examples include cotton balls (especially petroleum jelly-infused), birch bark shavings, dryer lint, finely scraped wood fibers (feather sticks), char cloth, or even dried grasses and cattail fluff.
- Kindling: Once your tinder is burning, kindling provides the initial fuel to grow the flame. Think pencil-lead to pencil-sized dry twigs and small sticks.
- Fuelwood: These are the larger pieces of wood that will sustain your fire once it’s established. Gradually increase the size from thumb-thickness to wrist-thickness or larger.
Ensure all your fuel sources are as dry as possible. Even damp tinder can make fire starting a frustrating ordeal.
Step-by-Step Guide: Igniting the Flame
1. Gather and Prepare Your Materials
Collect a generous supply of tinder, kindling, and fuelwood before you begin. It’s often said, “gather twice as much wood as you think you’ll need.” Process your tinder into a fine, loose nest. Scrape off some ferrocerium dust onto your tinder nest for an extra boost if conditions are challenging. (Source: Bushcraft and survival manuals)
2. Prepare Your Fire Lay
Choose a safe, cleared spot for your fire, away from flammable materials. Build a small structure to protect your tinder from wind and to facilitate airflow. Common fire lays include the teepee (good for starting), lean-to, or log cabin. Place your tinder nest gently within this structure, ensuring it’s accessible for sparking.
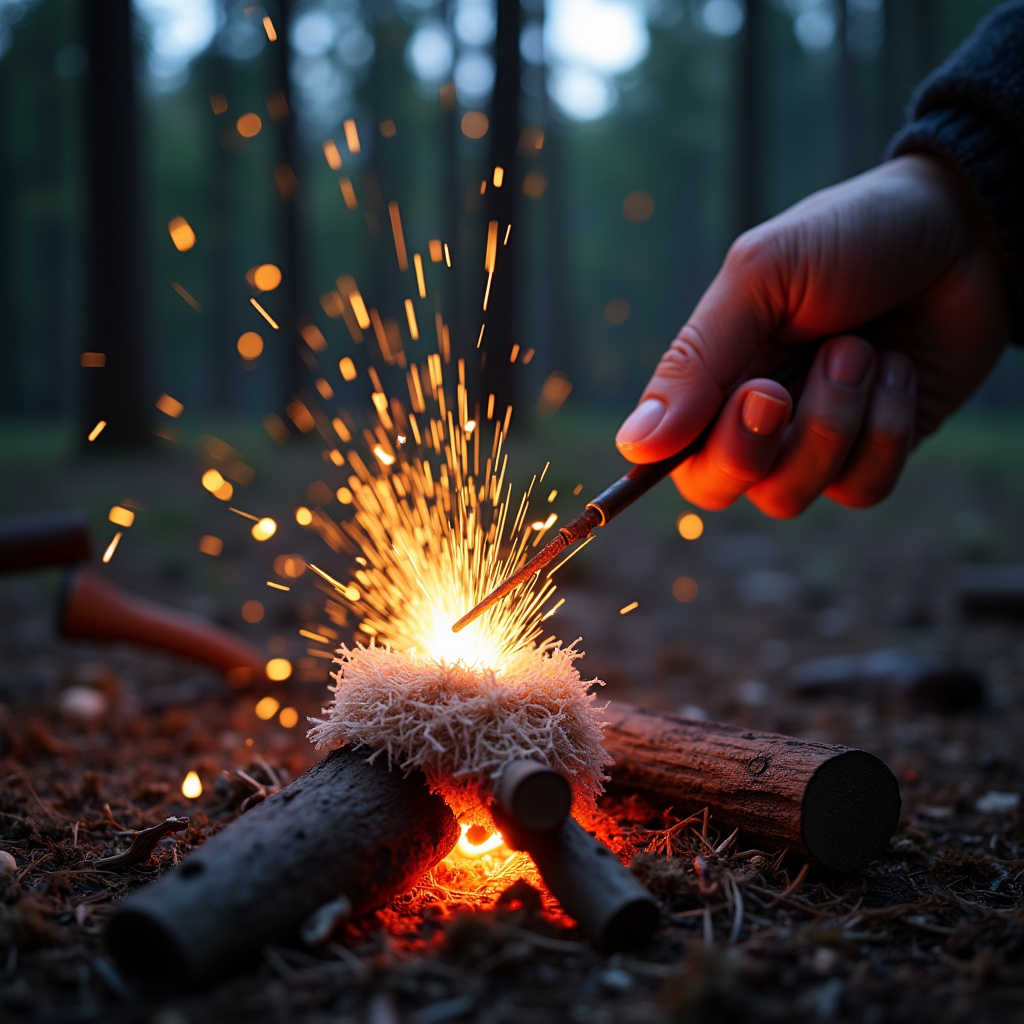
3. The Striking Technique
This is where practice makes perfect.
- Grip the Rod: Hold the ferro rod firmly with your non-dominant hand, positioning the end just above your tinder nest. Angle the rod slightly downwards towards the tinder.
- Position the Striker: Place the sharp edge of your striker (or knife spine) against the rod, close to the handle.
- Scrape Firmly: The key is to scrape away from your body, pushing the striker down the rod with firm, consistent pressure. It’s often more effective to pull the ferro rod back while keeping the striker stationary over the tinder, which helps keep your sparks precisely aimed. Aim for a shower of sparks directly onto the most flammable part of your tinder nest.
- Repeat: If your tinder doesn’t catch immediately, adjust your angle, pressure, or tinder fluffiness and try again. Don’t get discouraged!
4. Nurturing the Flame
Once your tinder ignites and you see a small flame, don’t rush! Gently blow on the glowing ember to provide it with more oxygen, coaxing the flame to grow. Slowly add your smallest pieces of kindling, arranging them so they don’t smother the flame but provide fuel. As the flame strengthens, gradually add larger kindling, then finally your fuelwood. Be patient and methodical; rushing can extinguish your nascent fire.
Tips for Success
- Practice, Practice, Practice: The more you practice, the more intuitive the process becomes. Don’t wait until an emergency to try it for the first time.
- Keep Tinder Dry: Store your primary tinder in a waterproof container or bag. In damp conditions, you might need to find creative solutions like scraping the dry inner bark from dead trees.
- Patience is a Virtue: Fire starting can be frustrating. Take a deep breath, assess your setup, and try again.
- Safety First: Always have water or a shovel nearby to fully extinguish your fire. Never leave a fire unattended. Adhere to Leave No Trace principles regarding campfire impacts.
Troubleshooting Common Issues
If you’re having trouble, consider these points:
- No Sparks: Is your striker edge sharp enough? Are you applying enough pressure?
- Sparks, but No Ignition: Your tinder is likely not fine enough, too damp, or too packed. It needs airflow and maximum surface area.
- Flame Dies Quickly: You might be adding kindling too quickly or too large, smothering the small flame. Or perhaps your kindling isn’t dry enough.
Conclusion
Learning to start a fire with a ferro rod is more than just a practical skill; it’s an empowering journey into self-sufficiency and a deeper appreciation for the ancient art of firecraft. It connects you to generations of outdoor enthusiasts and provides a profound sense of accomplishment. So, grab your ferro rod, gather your tinder, and step into the wilderness with confidence, knowing you have the power to create warmth, cook food, and foster community, all from a simple spark. Happy sparking, WildGridScouts!